Saturday, December 31, 2011

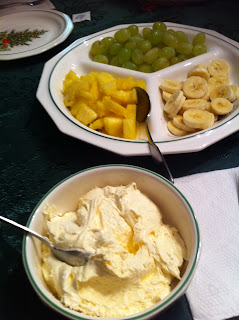
Cream Cheese Fruit Dip

Every Christmas Eve, BC's family makes a big spread of appetizers and finger foods to munch on throughout the day and into the night as we play games. This recipe was one of my old faithfuls...a quick easy thing to throw together, but tastes and like you spent some actual time and energy preparing it! Its very versatile, and can be made to healthier specifications, like sugar free pudding mix and lite Cool Whip!

Cream Cheese Fruit Dip
an AC original

1 box cream cheese pudding mix
1 8 oz tub Cool Whip
any fruit you wish to dip!

Combine the pudding mix and Cool Whip together. To save a bowl, do this in the Cool Whip tub! Refrigerate until ready to use.

Jalapeno Popper Cups

My Mom recently made these, and they are so yummy! I just had to add them to the blog. They make a great little appetizer!

Jalapeno Popper Cups
adapted slightly from AllRecipes
24 mini phyllo tart shells
8 oz cream cheese, softened
1 cup finely shredded sharp cheddar cheese
3-4 Tb. chopped jalapeno (depending on how hot you want them!)
2 Tb. hot sauce
bacon bits

Preheat oven to 350 degrees. Place phyllo cups on a baking sheet.

Stir together all other ingredients, except bacon bits, and spoon mixture into each phyllo cup. Top each with a sprinkle of bacon bits.

Bake for 15-20 minutes. Serve warm!

Sunday, December 18, 2011

Puppy Cookies

Wow! Sorry for the delay! Definitely a lot going on at the casa de S.T.E., but I have TONS of recipes ready to be blogged about!

This is one not quite meant for human consumption (although, I'm sure you could if you really wanted). I decided to do something a little different for Coco and make her a treat instead! Plus, I wanted to remember our neighbors pets in our holiday baskets this year.

I did a ton of research on what sorts of ingredients are best for puppies tummies. (Some of you are probably thinking--ummm our dogs clear our dinner plates...so what?!) There are tons of things dogs shouldn't eat, and even more ingredients found in food we eat everyday that can cause many dogs to get sick, or at least not feel well. One of those is gluten. I found a ton of websites that stated that many dogs have gluten allergies, or at least can't digest it well. Another is baking powder--apparently, it can be toxic to dogs.

With all that in mind, I created this recipe, thanks in part to the recipes found on dogtreatrecipes.orghere and here.

(Funny story about these pictures--I actually took the one on the right first. When I leaned down with the cookie, Coco immediately took it from me and I had to dig it out of her mouth just to get the proper picture on the left! Seriously, she's addicted.)

Bacon-Flavored Dog Cookies

1 c. brown rice flour
1/2 c. uncooked oats
1/2 c. water
1 egg
3 Tb. extra virgin olive oil
2 Tb. bacon drippings**

Preheat oven to 350 degrees.

Combine all ingredients. Add extra water if dough is too dry. Take about a tablespoon of the dough, roll into a small ball and then flatten for even baking. Bake for 15 minutes, turning half-way through. Feel free to adjust cooking time based on how crispy you want the cookies to be!

**You can add 2 Tb. of any flavoring you would like...I used bacon drippings, but you could do any other type of fried/sauteed meat, like sausage or ham, use chicken or beef stock, or save the oil from a can of tuna or chicken.

Tuesday, November 15, 2011

Pesto Chicken Pizza

PEOPLE. This pizza is crazy delicious. If you like pesto, you must make this pizza!! You will not be disappointed. It takes literally no time to assemble or cook, and got rave review from my husband!! We tried to make it a smidge healthier by using thin crust, and we found individual size thin pizza crusts at the store! I made my own pizza sauce and pesto for this one, and I'll include the recipes for those after the main pizza recipe.


Pesto Chicken Pizza
as adapted from Plain Chicken

1 pizza crust 
1/4-1/3 c. pizza sauce
2-3 Tb. pesto
1-2 c. mozzarella cheese
5 oz. can of cooked chicken

Preheat oven to 450 degrees.

Mix chicken and pesto. Start with 2 Tb. and add to taste. Set aside.

Brush pizza sauce onto pre-cooked pizza crust. Put a layer of mozzarella cheese on top of the pizza sauce. Sprinkle the chicken/pesto mixture over the mozzarella. Sprinkle more mozzarella over the chicken.

Bake pizza for 10-15 minutes, or until crust begins to brown and cheese is thoroughly melted.


Pizza Sauce
You can totally make this on your own, and save yourself the money of buying a huge jar! The only money you put into this sauce is the cheap lil can of tomato sauce.

1 8oz. can of tomato sauce
1/2-1 Tb. pizza seasonings*

Open tomato sauce and pour into microwave safe bowl. Add seasonings to tomato sauce, starting with 1/2 Tb. Add more seasonings to taste, up to 1 Tb. Stir together. Put plastic wrap over the bowl and heat in the microwave for 30 seconds. Stir.

*I have an already prepared "pizza seasonings" in my spice rack. This is simple enough to make on your own, though. Just combine equal parts of basil, oregano, marjoram, and garlic.


Pesto
adapted from Simply Recipes


1 cup fresh basil leaves, packed (or 2 TB. dried, crushed basil in a pinch)
1/4 c. Parmesan cheese
1/4 c. extra virgin olive oil
1/6 c. pine nuts*
3/4 tsp. minced garlic (about 1 1/2 minced garlic cloves)
salt and fresh ground pepper

Pulse the pine nuts in a food processor a few times to break them into small pieces. Add in basil and pulse a few more times. Add in garlic and again pulse the food processor a few times.

Turn the food processor on and slowly add the olive oil in a slow stream. Stop a few times to scrape down the sides. Once the olive oil is completely mixed through, add the cheese and blend in the food processor until completely combined. Add salt and pepper to taste.


*I have heard that you can use walnuts in place of pine nuts, and I have to say...it worked!! I'm not a pesto snob by any means, so others might not agree with this, but if you don't have any pine nuts and you do happen to have walnuts--go for it!

Roasted Brussel Sprouts

I keep seeing all these recipes lately for brussel sprouts. I found a couple recipes online with yummy ingredients, so I decided to use them to make my own! In the picture below, they are served with Italian Cream Chicken with pasta, which you can find here.


Roasted Brussel Sprouts
as adjusted from Elefantitas Alegres--Menu Sunday and SkinnyTaste

1 pound of brussel sprouts, washed clean with ends cut off and halved
2 pieces of bacon
1 Tb. extra virgin olive oil
1/2 c. dry white wine
1/2 c. chicken broth
1 shallot, diced
1 tsp. minced garlic/2 cloves garlic
salt and pepper

Preheat oven to 450 degrees.

Cut up bacon into small pieces and fry. Remove bacon pieces to a paper towel. Put shallot, garlic, and EVOO into bacon grease. Cook on medium heat until shallot begins to get translucent. Add in brussel sprouts and toss in garlic/shallot mixture. Add in white wine and chicken broth. Cook for about 5 minutes on medium heat, or until brussel sprouts start to lose their crisp green color. The brussel spouts should start to soak up the liquid and get soft.

Put brussel sprout mixture into a baking dish and put into oven for about 10-15 minutes. Watch the bussel sprouts closely to ensure they don't burn. Be sure to toss them about every 5 minutes to ensure even cooking.

Italian Cream Chicken

This is a recipe I found from a friends food blog, Sweet as P.I.E. She is big into slow cooker recipes, and when she posted this new one, I decided to give it a shot. I adjusted it a tiny bit, and fixed it with regular angel hair pasta. I also made roasted brussel sprouts with this dish, and you can find that recipe here. The best thing about slow cooker recipes--you can put in frozen meat! No defrosting needed!

(all the ingredients--notice the box of slow cooker liners in the back--they are great!)

(the finished product!)

Italian Cream Chicken
as adapted from Sweet as P.I.E.

6 boneless, skinless chicken thighs
2 packets of zesty italian dressing dry mix
1 8oz. package of fat free cream cheese
1 can cream of chicken and mushroom soup

Put the cream cheese, soup, and mixes into a slow cooker. Allow the cream cheese to melt until all can be stirred and mixed together. Add in chicken and cook on low for 6-8 hours. Use a fork to shred chicken. Serve over pasta.

Homemade hot chocolate

I love hot chocolate once the weather turns cooler!! I started to dislike the packaged variety once I realized how easy it would be to make it from scratch! With recipes like this, everyone's taste is different, so add ingredients slowly to get the right cocoa/sugar levels for your liking. Also, you can adjust the ingredients using different types of milk/cream (I always use skim milk), different types of sweeteners, and different varieties of cocoa (I used regular here, but I love using Hershey's dark chocolate cocoa!).


Homemade Hot Chocolate
serves 2

2 1/4 c. milk
4 Tb. cocoa
4 Tb. sugar
1 tsp. vanilla

Pour milk into saucepan. Heat slowly over low heat so as to not scald the milk. Add in all other ingredients and stir until warmed. Top with marshmallows!!

Wednesday, November 9, 2011

Apple Butter and How to Can!

I'm SO excited to bring this recipe to you guys!! There are so many kitchen things I've gotten to experiment with lately, and I have been having a lot of fun. My most recent attempt was making apple butter and  canning it!

The original recipe comes from SkinnyTaste, a website I've found tons of great recipes on. I have made the apple butter recipe before, but cut it in half because I didn't want gallons of the stuff and had really no way to gauge how much it would make. (The fact that the recipe says it makes 16 2Tb. sized servings pretty much meant nothing to me. See? I'm super cooking-saavy.)

Anyway, I tried it again, making the full recipe, with some left-over 8 oz. jars from my Mom. I had 6 jars at my disposal and only ended up using 4. I want to make this for holiday baskets, so I'll probably buy some of the smaller 4 oz. ones so I can make more from this recipe.

I'll add my instructions for canning at the end.

Slow Cooker Apple Butter
from SkinnyTaste

6 apples (I used in-season gala)
1/2 c. white sugar
1/2 c. brown sugar
1 tsp. ground cinnamon
1/8 tsp. allspice
1/8 tsp. nutmeg

Chop up apples into small pieces. Place into slow cooker. Top with remaining ingrediants and stir well. Cover and cook on low for 10 hours. Uncover and puree with an immersion blender. Cook uncovered on high for 1-2 hours.

*Right after the apples went into the crock-pot*

*After a many hours in the crock-pot. No noticeable difference, really*

*Breaking out the immersion blender--don't look at my messy crock-pot!!*

Canning
from Food Network Magazine

1. Wash jars, lids, and bands in hot soapy water. Place the jars in boiling water for 10 minutes. After 10 minutes, simmer jars until you need them.

2. Place lids and bands into simmering (not boiling!) water until you need them.

3. Remove jar one-by-one from simmering water and fill with hot preserves/jelly/butter/etc. Leave headspace on each jar.

4. Use a clean small spatula (I used a spatula handle) to go along the inside of the jar to release any air pockets.

5. Wipe rims and threads and make sure they are clean.

6. Remove lids and bands from the simmering water and place on top of filled jars. Screw tops onto jars until tight.

7. Place filled jars back into boiling water. Make sure water is 2 inches above tops of jars. Once boiling, cover pot and boil for 15 minutes.

8. After 15 minutes, lift jars from hot water and transfer to a kitchen towel. Let sit for 24 hours to ensure seal forms.

9. Check the seal--make sure the lids do not pop! Store unopened jars in a cool, dark place for up to one year. Refrigerate after opening.

**Jars boiling!**

**Lids and bands simmering**

**Preparing to boil the finished jars**

**All finished and ready to go in the cabinet!!**

Monday, November 7, 2011

Hot Apple Cider (Crockpot version)

Recently I helped out with a post-wedding shower at church, and brought, among other things, hot apple cider. Since its fall-ish outside, I felt the need to bring something that went with the season. I ended up with this recipe from Tasty Kitchen, which I then adapted. It turned out very good, and everybody seemed pleased with the results!


Hot Apple Cider
adapted from a recipe by Tasty Kitchen user babskitchen


1 gallon apple cider
1/2 c. brown sugar
1 apple
1 orange
3 tsp whole cloves
4 cinammon sticks, each broken in half
1/4 tsp allspice
2 dashes nutmeg

Pour the apple cider into a Crockpot (mine was a 6 quart Crockpot and worked perfect). Add in brown sugar, cinnamon sticks, allspice, and nutmeg. Turn on low.

Cut up the orange into 4 slices. Drop into cider mixture. Cut the apple in half and stick cloves all over the apple, both sides. Drop apple halves into cider mixture.

Cook on low for 4-6 hours.

Peanut Butter Cookies

This is my favorite, most easy go-to recipe. These cookies are so yummy, and only 4 ingredients!


Peanut Butter Cookies
adapted slightly from Paula Deen's Kitchen Classics cookbook

1 c. peanut butter
1 c. sugar, plus more for sprinkling
1 tsp. vanilla
1 egg

Preheat oven to 350 degrees.

Combine all 4 ingredients. Drop tablespoon sized cookies onto parchment paper lined cookie sheets. Sprinkle each cookie with sugar and flatten out with a fork, if desired. 

Bake for 12-14 minutes, depending on desired doneness of cookie. (12 minutes will get you a wonderfully squishy cookie!)

Sour Cream Noodle Bake

My Mom downloaded this recipe from the Pioneer Woman website and was going to make it for just her and my Dad, but I offered to make it and clean up if she would buy the ingredients so all four of us could enjoy it. It was a good deal! :)

I liked this casserole, but it ended up tasting like lasagna to me. Which is fine, but I guess I just expected it to have its own unique taste. I made some adjustments to the original recipe to make it a tad healthier.


Sour Cream Noodle Bake
as adapted from The Pioneer Woman, here

1 pound ground chicken breast
1 15oz. can tomato sauce
1/2 tsp. salt
black pepper
8 oz. weight egg noodles
1/2 c. light sour cream
1-1/4 c. low fat small curd cottage cheese
1/3 c. green onion
1 c. grated sharp cheddar cheese

Preheat oven to 350 degrees.

Brown ground chicken in a large skillet. Drain any fat and add tomato sauce, salt, and plenty of pepper. Stir together, and simmer while you prepare other ingredients.

Cook egg noodles until al dente.** Drain and set aside.

Combine sour cream, cottage cheese, and more pepper. Add to noodles and stir. Add green onions to this mixture and stir.

With a prepared baking dish (need a big one here, like 9x13-ish size), add half the noodles to the dish. Top with half the meat mixture, then sprinkle on half the cheese. Repeat with noodles, meat, and cheese. 

Bake for 20 minutes, or until cheese is melted.


**I have this instruction starred because I don't want you to be like me. Usually when I cook pasta, I put it right into the water and then turn on the heat. Mostly because I think waiting for water to boil first is dumb. And I am impatient. I took this approach with the egg noodles, and I am here to tell you, DON'T. They turned out fine, but they were way over cooked. Like, incredibly soft. Not the way a noodle should be. It ended up being fine in this dish, and no one said anything about it, but for the future, definitely boil water FIRST, and then put in the egg noodles.

Thursday, October 20, 2011

Yummy Chicken Chili

As soon as the weather hits less than 60 degrees around here, I make a big pot of chili. Luckily, chili is also really easy to make into a healthy meal, and I wanted to see what I could do. For this recipe, I used a basic chili guideline, as provided by Pioneer Woman.

The first step was swapping the beef for ground chicken breast. You definitely do not even miss this exchange. I usually exchange the beef for turkey, but the turkey was super expensive, and I went with chicken. Side note about turkey and chicken: make sure you are using the ground breast meat, not just the regular ground meat. For instance: ground turkey breast is the healthy stuff and ground turkey can have just as many calories, fats, cholesterols, etc. as ground beef.

Also, I used my taco seasoning mix in this recipe for the seasoning. This recipe can be found here from All Recipes. I am a HUGE proponent of using non-packaged seasonings, because there is so much hidden salt in those!! By mixing up your own seasonings, you not only save money, but you can closely monitor your sodium intake.

This recipe will make 8 servings.

Without further ado: here's the recipe!


Chicken Chili
(as adapted from Pioneer Woman's Frito Chili Pie)

1 lb. ground chicken breast
2 garlic cloves OR 1 tsp. minced garlic
1 c. diced onion
1 can tomato sauce
1 can Rotel
1 can crushed tomatoes
2 Tb. taco seasoning (or 1 package of chili seasoning)
1 can Pinto beans (drained and thoroughly washed)
1 can Kidney beans (drained and thoroughly washed)
5-6 pickled jalapeno slices, chopped
1/2 tsp of pickled jalapeno juice

In a big pot, put tiny bit of olive oil in the bottom, along with the diced onion and garlic. Let those sweat together for a few minutes and add in the chicken breast. Cook until just finished and add in the tomato sauce, Rotel, crushed tomatoes, seasoning, beans, jalapeno slices, and juice. Stir together. Bring heat to a low temperature and let it cook for as long as possible!! (At least 6 hours.)

**This recipe is AMAZING with the BEST Cornbread!!

Tuesday, October 18, 2011

Chewy Chocolate Chip Cookies

There are two kinds of people in this world: those who like crispy cookies, and those that like chewy ones. (And those that don't like cookies at all, I suppose, but that cross-section of the population is totally messed up.)

Anyway, I am in the chewy cookie category. Love them. But can't seem to get a good recipe for them. At least, not one that gets you the perfect crisp edge with the delicious chewy center. (The more I type, the more I am starting to despise the word "chewy.")

Everybody claims to have the perfect recipe for the best chewy chocolate chip cookies. Until now, I hadn't found one that truly was, at least not without spreading out too much, getting too thin, etc. I found this recipe on Pinterest, courtesy of Apple A Day and gave it a shot. Verdict: SO GOOD!! These cookies not only retain their shape and do not spread out, but get a tiny bit crispy on the edges and stay super soft in the middle! Its all due to a small bit of cornstarch in the ingredients. It makes all the difference.


Chewy Chocolate Chip Cookies
(as a tiny bit adapted from Apple A Day, via Food Network Canada)

3/4 c. salted butter, softened
3/4 c. brown sugar
1/4 c. granulated sugar
1 egg
2 tsp. vanilla extract
2 c. all-purpose flour
2 tsp. cornstarch
1 tsp. baking soda
1/8 tsp. salt
1 c. chocolate chips

Preheat oven to 350 degrees.

In a stand mixer, mix the sugars and softened butter together until light and fluffy. Add in egg and vanilla. Mix until blended.

Add in dry ingredients until combined, fold in chocolate chips.

Bake for approximately 7-10 minutes, depending on how big you make your cookies. Do not bake more than 10 minutes. Note: the tops will not brown, the edges and bottoms will turn barely golden brown.

Let cool on a wire rack. Once they are no longer scorching, try not to eat them all in one sitting :)

Tuesday, October 11, 2011

Red Velvet Cheesecake

This is a recipe I actually made a while ago, but it definitely needed to be added to the site, because it is so yummy! Last Valentine's Day, I was trying to think up something creative to make for my husband that wasn't red velvet cake. There is a bit of a back story there: Valentine's Day is pretty special for us--its the day my husband proposed. (Which is cliche, I know, but I definitely was not expecting it because it is, in fact, cliche!) Also, there is an amazing bakery in my husband's hometown that makes the most delicious red velvet cupcakes. I therefore know what a delicious red velvet cupcake tastes like and I have been ruined forever on all other red velvet cupcakes.

So, in my search for something unique, I ran across a recipe for a red velvet cheesecake on the McCormick spice website. (Big stretch, I know.) It looked pretty daunting, but I knew I could tackle it! It ended up being much easier than I expected, and I'm looking forward to trying it again!


Red Velvet Cheesecake
2-8 oz. packages of regular cream cheese
1/2 c. sugar
1 tsp. vanilla
2 eggs
2 oz. semi-sweet baking chocolate, melted
1 Tb. red food coloring (may need more depending on brand/deepness of color desired)
1 prepared Oreo crumb crust

Preheat oven to 350 degrees.

Beat cream cheese, sugar, and vanilla in a large bowl on medium speed until well blended. Add eggs one at a time, mixing on low until completely combined.

Take one cup of batter out of the large bowl and put into a separate bowl. Add the red food coloring to this separate amount of batter. Then quickly whisk in the melted chocolate.

Pour the red-tinted batter into the crust first. Top with the remaining regular batter. Bake for 40 minutes, or until set. Let cool completely on a wire rack. Refrigerate for at least 3 hours.

Banana Nut Bread

I love baking. Its probably my most favorite thing ever. I hate when a recipe that sounds great turns out gross, but I suppose that sort of thing is inevitable sometimes. This recipe, however, is not one of the failures.

I had some dying bananas on my counter one day and started googling recipes for banana nut bread. I came across quite a few, of course, but paid special attention to the comments and reviews. This one from The Neelys was rated pretty highly, so I gave it a shot. IT IS SO GOOD!!


Banana Nut Bread
1 stick butter, salted
1 1/2 c. all-purpose flour
1 tsp. baking powder
1 tsp. baking soda
1 tsp. salt
3 large very ripe bananas
1 cup sugar
2 eggs OR 3 egg whites
1/2 cup reduced-fat sour cream
1 tsp. vanilla
3/4 cup chopped walnuts

Preheat oven to 350 degrees. Butter and flour a bundt pan and set aside.

In one small bowl, whisk together the flour, baking powder, baking soda, and salt. In another small bowl, mash up the bananas, leaving a small bit of texture. In a large bowl, mix together the butter and sugar until light and fluffy. Add eggs one at a time. Stir in the bananas, sour cream and vanilla and mix until just combined. Add the dry ingredients slowly, mixing as you go. Finally fold in the walnuts.

Bake for 40-50 minutes.

Roasted Broccoli

I'm always on the look-out for how to make blah veggies yummy. I've been hearing a lot about roasting broccoli lately, so I decided to give it a shot. I found this recipe from the Skinny Taste website. Discovered lots of fun things on there I'm going to try in the upcoming weeks, so watch for those!


Roasted Broccoli
3/4-1 lb. of cut broccoli, cleaned, with short stems
3 cloves of minced garlic
11/2 Tb. extra virgin olive oil
salt and pepper

Preheat oven to 450 degrees. Wash and completely dry broccoli. Trim up stems if browned. Combine EVOO, garlic, salt, and pepper in a large bowl. Roast for about 20 minutes, or until broccoli is brown and tender. To continue to soften the broccoli after taking it out of the oven, cover the dish with tin foil and allow the broccoli to steam.

Lemon Meringue Pie

I'm not a very experienced baker, but I definitely wanted to try to go big and make a lemon meringue pie. I love perusing the Whisk Kid's website, and discovered her recipe for lemon meringue pie. Her's looks much better than mine, but her recipe is spot on! I was terrified that my pie would end up tasting like lemon-y scrambled eggs, but it didn't!! It gets much better after a little bit of time in the fridge.

Also, PLEASE make the pie crust if you can! Her recipe for the crust is so buttery and delicious...its something a frozen pie crust just canot match.


Lemon Meringue Pie

Crust:
1 c. flour
1/2 tsp. salt
8 Tb. butter (cut up, and very cold)
4 Tb. water, very cold

Combine flour and salt. Cut in butter until tiny bits. Again, make sure the butter is very cold. Add just enough flour until moistened, knead a few times. Wrap up dough and refrigerate from anywhere to 30 minute to two days. (As a side note, I did not do this. DO NOT LEAVE OUT THIS STEP. It is very important. My pie crust did not act right once it hit the oven!)

When ready to use the crust, roll out until even to fit a 9" pie plate. Lay over pie plate, pinch down the edges, and prick dough all over with a fork. Place back into freezer.

When ready to bake, preheat oven to 425 degrees. Place pie weights/beans/rice/etc onto pie crust when baking to ensure it bakes flat. (Also didn't do this. Again, NECESSARY!) Bake for 20 minutes. Remove weights/beans/rice/etc. Bake for 5-10 minutes longer. Remove from oven and prepare filling.

Pie Filling:
4 egg yolks at room temperature
1 c. sugar
2 Tb. flour
3 Tb. cornstarch
1/4 tsp. salt
1 1/2 c. water
2 lemons, juiced and zested
2 Tb butter

4 egg whites
6 Tb. white sugar

Place egg yolks in large clear bowl. Whisk and set aside.

Combine cup of sugar, flour, cornstarch, and salt in a saucepan. Stir in water, lemon juice, and lemon zest, and bring mixture to a boil, stirring continually. Stir in butter. Remove from heat. Pour 1/2 cup of mixture into egg yolks, whisking vigorously to ensure that egg yolks become tempered. Pour those egg yolks into the sugar mixture and continue whisking. Put pan back on the heat and continue cooking until very thick. (Just a note, this took a really long time for me!) Remove from heat and pour into cooked pie crust.

Put egg whites into mixing bowl. Using a free standing mixer or hand mixer, beat egg whites together. Slowly add the 6 Tb. of sugar and beat until you have stiff peaks.

Spoon meringue onto hot filling. Use a spatula/spoon/whatever, to fluff up the top, moving meringue to border of crust.

Bake for approx. 10 minutes, or until the tips of the meringue start to brown.

Monday, September 26, 2011

The BEST cornbread

My husband grew up in a family with some pretty good cooks. Not only his parents and sister, but his extended family are pretty talented too. I've got a few of those recipes waiting to be made, but for the time being, I have to share BC's sister's cornbread recipe. It is seriously so good. I have always tried to find the perfect balance of corn-y taste to sweetness, but never could figure it out. Once I had his sister's cornbread, I was sold! I had to have that recipe. And now, I share it with you.


Anna's Cornbread
1/2 c. butter (salted)
2/3 c. sugar
2 eggs
1 c. buttermilk
1/2 tsp. baking soda
1 c. yellow cornmeal (fine ground is best here)**
1 c. all-purpose flour
1/2 tsp. salt

Preheat oven to 375.

Butter and flour an 8x8 baking dish. In a large bowl, melt the butter. Stir in the rest of the ingredients, in order. Stir vigorously until few lumps remain. Pour batter into the prepared pan.

Bake for 30 minutes, or until a toothpick comes out clean. Be sure not to over-bake!

**A swap-out: use a 8.5 oz. box of the Jiffy corn muffin mix instead of the fine ground cornmeal. It tastes great as well! If you make this swap, drop the flour amount down to 3/4 cup.

Cinnamon Rake

I stumbled across this recipe after I saw a very delicious-looking picture on Pinterest. I followed it to this recipe on Cookin' Up North's site. I decided to shorten up the name a bit to a "rake"--part roll, part cake, completely delicious.

I was a little skeptical, because the recipe seems like it makes so much food, but after a few tweaks, it turned out to make just enough. I'm pretty sure my husband and I devoured it in a day and a half.

 (before the icing...you can see all the pretty swirls!)


Cinnamon Rake
3 c. flour
1/4 tsp. salt
1 c. sugar
4 tsp. baking powder
1 1/2 c. milk
2 eggs
2 tsp. vanilla
1/2 c. butter (salted), melted

Mix-In:
1/2 c. butter
1/2 c. brown sugar
1 Tb. flour
1 Tb. cinnamon

Icing:
1 c. powdered sugar
2 Tb. milk
1/2 tsp. vanilla

Mix all cake ingredients, from the flour through the vanilla on the list. Slowly stir in the melted butter. Pour into a buttered and floured 9x13 pan. In a separate bowl, mix together the mix-in ingredients. Drop the mixture in small bunches, about a tablespoon amount each, all over the top of the unbaked cake. Take a butter knife and swirl the mix-in ingredients all around the cake batter.

Bake at 350 degrees for about 30 minutes.

While the "rake" is baking, mix the icing ingredients together. Start with the amounts listed here, and then add more milk or powdered sugar to adjust to desired thickness. Everybody likes something different when it comes to icing!

When the cake is done baking, pull from the oven and let it sit for a few minutes. Poke a few holes on the top of the cake to make sure the icing sinks into the cake in a few places (not too many though!). Making sure the cake is still warm, slowly pour the icing all over the cake.

Try not to lick the bowl clean. :)

Wednesday, September 21, 2011

Buttermilk Pancakes

Mmm MMM! I love pancakes :) My Dad always made pancakes growing up in old cast iron skillets. He always had the skillet seasoned just right and had the oil heated perfectly. He always made the most delicious bacon, but more on that in a second. I have made pancakes over the years for myself, and always went with the box mix. Quick and easy. That's what my Dad used, after all. BC never really liked pancakes, and that always made me a little sad.

I was therefore determined to figure out an easy, delicious, homemade recipe to bring him to my side! And here it is:

 (finished product)

(one of those giant non-stick griddles is a must-have!!)

Buttermilk Pancakes
(as adapted from Or So She Says)

1 C. all-purpose flour (again, used White Lily for the fluffier pancakes. If using this brand, please add 2 Tb. for every cup of flour used)
2 Tb. sugar
1 tsp. baking powder
1/4 tsp. baking soda
1/4 tsp. salt
1 c. buttermilk
1 1/2 Tb. melted salted butter
1 egg
1 tsp. vanilla

Mix the dry ingredients together first. Mix all the wet ingredients in a separate bowl. Pour the wet ingredients into the dry slowly, whisking as you go. When it is all just combined, stop mixing. Don't over-mix! Heat up your griddle to medium heat. Take a butter stick and run it all around the griddle. When the butter starts to get all melty and shiny, start dropping pancake batter onto the griddle, in whatever size you want. The most important thing is to wait to flip them until bubbles start forming on the batter. Essentially, you want them to cook almost all the way through on one side before you flip. So wait for lots of bubbles. I always peek underneath with a spatula to make sure they aren't burning. If they are getting too brown and not many bubbles have popped up, turn down the heat!! You need a nice browning to bubbling ratio.

Once they are done, you should add some real cream butter to the top and only use real maple syrup. I'm convinced it is the ONLY way to eat pancakes :)

As for the bacon....well, the secret is to cook it in a cast-iron skillet and pull it out just before its finished., It will continue to sizzle a bit once out of the pan. You want that just-crispy-enough taste!

Enjoy!

Tuesday, September 20, 2011

'Joes and 'Toes

I love sloppy joes. When I was younger, I hated them. I unfortunately had a Manwich one time and it totally grossed me out. (What's in those things anyway?) I guess in my tiny brain I figured that's how all sloppy joes tasted and I was not going to deal with that as a meal option ever again.

Then, one day, Mom decided to make sloppy joes from the little spice packet. And you know? They weren't too bad. My hatred therefore subsided, and sloppy joes and I were totally cool with each other.

I wanted to make a fun dinner for BC and my parents last Friday so I decided to make sloppy joes, fried green tomatoes, and sweet potato french fries.


DISCLAIMER: There is no set recipe for the sweet potato french fries. I have made sweet potato french fries forever, and love them too. I usually cut them up in little strips, toss them in olive oil and Tony Chachere's, and cook them at 425 degrees for like 15 minutes. I saw something on Pinterest that said to toss them in cornstarch first to make them crunchy from the oven. Tried it. Ended up with cornstarch-y tasting fries. BOO.

The fried green tomatoes were a first time try for me. They turned out great!

Sloppy Joes
(as adapted from Plain Chicken)

1 lb. lean ground beef
1 1/2 Tb. onion powder
1 14-oz. can tomato sauce
3 Tb. yellow mustard
1 tsp. chili powder
2 tsp. Worcestershire sauce
1/2 tsp. sugar
1/2 tsp. dried oregano
1/2 tsp. garlic powder
1/2 tsp. taco seasoning (my own personal mix)

Place the meat into a pan and sprinkle onion powder all over it. Brown meat. Drain if any rendered fat. Add in the tomato sauce and remaining ingredients. Heat to medium heat and then reduce for 10 minutes. Taste mixture and adjust seasonings to taste. Continue to cook for another 10 minutes.

Its important to let this mixture cook for a while before you add in more seasonings. I discovered that the taste actually changed the longer that it cooked. The longer it cooked the better it tasted!!

Fried Green Tomatoes
(adapted from My Recipes)

2 green tomatoes
bacon grease (I know, I know)
1 egg
1/2 cup buttermilk
1/2 cup flour
1/2 cup cornmeal
1 tsp Tony Chacheres (or whatever seasonings you like)
1/2 tsp salt
1/2 tsp black pepper

Take the bacon grease and put a couple teaspoon fulls in the bottom of a cast iron skillet. Turn on the stove top to medium low and allow that to melt. Then add in some cooking oil (I used peanut) to have just enough to fry in. (I added enough that the tomatoes could just barely be pushed under the surface and be completely covered by the oil when cooking.)

Whisk together the egg and buttermilk and set aside. Stir together flour, cornmeal, and seasonings.

Dip a slice of tomato in buttermilk mixture and then into the flour mixture. Make sure the slice is completely covered by the flour mixture. Slowly drop the tomato slice into the hot oil. I was able to fit about 4 slices in the pan at a time to ensure even cooking.

Extra salt and pepper when they come out of the oven!

**I used regular yellow cornmeal for these. The original recipe called for cornbread mix, white probably would have been less coarse, and possibly more tasty, but I wasn't about to break open one of my little cornbread mixes without using all of it!

Thursday, September 15, 2011

Enchiladas

First off, I love this recipe! When I've made it in the past, I've used canned enchilada sauce. No more, my friends! The recipe comes partly from this recipe from the Pioneer Woman for the enchiladas, and partly from this recipe from Lynn's Kitchen Adventures for the sauce.

(Please notice the Spode dish. I LOVE this thing! I bake in it all the time!)

Enchilada Sauce
1 can (14.5 oz) can of diced tomatos with green chilies
1 Tb. onion powder
1 tsp. chili powder
1/2 tsp. ground cumin
1/8 tsp. dried oregano
1 clove garlic/1 tsp. minced garlic
1/2 tsp. taco seasoning*

Blend all ingredients until smooth. Pour into saucepan and heat all the way through.

*I made up my own taco seasoning. Its really delicious, and I like being able to throw the spices into dishes whenever I want without opening a packet. You can find the recipe I used here, on All Recipes.

Enchiladas
1/2 c. chopped green onion
1 c. light sour cream
1 12.5-oz can shredded chicken
1 c. to 1 1/2 c. shredded cheese (I used a combo of mild cheddar and monterey jack--what I had in my fridge!)
1/4 tsp. ground cumin
1/8 tsp. cayenne pepper/ground red pepper
1/4 tsp. my taco seasoning
6 flour tortillas
1 recipe of enchilada sauce (or you an use a can of the pre-made stuff if you're in a hurry)

Preheat oven to 375 degrees.

Combine chicken, sour cream, chopped green onion, all spices, and 3/4 c. of the cheese. Give it a taste, make sure the spices are where you want them...add more if you like really spicy stuff! Get ready to get messy here: take a large plate, spread some of the enchilada sauce on it and put one flour tortilla on top of the sauce. Spread more sauce on top and flip it over to make sure the tortilla is covered. Its ok if not a lot of sauce sticks to it. Take a spoonful of the chicken mixture and put it in the center of the tortilla. Roll up the tortilla, making sure to fold in the sides so the mixture is completely contained. Place into an 8" x 8" baking dish. Repeat with the remaining 5 tortillas. Once finished, spoon more of the sauce on top of the enchiladas. Top with the remaining cheese, depending on how much you prefer.

Bake for about 15 minutes, or until cheese is fully melted.

These enchiladas are so good! The sour cream makes them so gooey and yummy! And the homemade enchilada sauce puts it on the map for sure! It seriously only took me a few minutes to make it up, and really makes all the difference in the dish. Give it a try!

Wednesday, September 14, 2011

Pumpkin Cupcakes

I have really been wanting to usher in the fall season by making something pumpkin-y. I like pumpkin flavored stuff, but I can't deal with the ones that are super overwhelming. I discovered some recipes through Pinterest, and took the cake part of this recipe and tweaked it a bit to create my own recipe! The result is an amazingly moist and tasty cupcake! The frosting part of the cupcakes were replicated from this recipe and turned out so yummy! The cream cheese is a perfect tart combination for the light pumpkin flavor.


Cupcakes:
1 box yellow cake mix
2 cups of Pumpkin Pie filling (about a half a can of the Libby's Pumpkin Pie filling)
3 eggs
1/3 c. oil
1/3 c. water
1 1/2 tsp. pumpkin pie spice
1/2 tsp. cinnamon

Preheat oven to 350 degrees. Stir everything together, mix until completely smooth and combined. Bake for about 18-23 minutes. I stopped at 18 minutes and let them rest for quite a while to maintain the soft texture.

Frosting:
2 8-oz. cream cheese packages
1/2 stick of unsalted butter
2 1/2 c. powdered sugar
1 tsp. vanilla
1/4 tsp. cream of tartar

Cream the butter and cream cheese together first until completely beat together. Then mix in the powdered sugar, vanilla, and cream of tartar. Beat again until light and fluffy. Place frosting in the fridge (if you have the time) to allow the frosting to thicken up a bit for better piping/spreading.

These are so good! You will love them! Promise!

**I brought these to work, and we started eating them immediately. Like, at 8:30 in the morning. We consequently decided that cupcakes are considered "muffins" when eaten before lunch ;)

Tuesday, September 13, 2011

Pizza Puffs

Last weekend, BC and I went over to my parents house to check out the Alabama game. I made up a couple different finger foods, and this was one of them! I ran across the original recipe on Annie's Eats and tweaked it a little bit from there. I LOVE pizza, and I couldn't resist giving this one a shot!

Pre-bake:

Post-bake:

1 "batch" of raw pizza dough (enough to make one pizza)
mozzarella sticks, cut into cubes
pepperoni slices
italian seasoning
olive oil
parmesan cheese

Preheat oven to 400 degrees.

Spray a 9" pie plate with cooking spray. Pull off a piece of pizza dough, a little smaller than the size of a golf ball. Take one piece of pepperoni and one small cube of mozzarella, and press into the dough. Seal the sides of the dough up around the pepperoni and cheese. Be sure to seal up completely, or else the cheese will melt out! Once you have used up all the pizza dough, brush tops of the dough balls with olive oil. Sprinkle with italian seasoning and parmesan cheese.

Bake for about 20 minutes, or until the pizza puff tops turn golden. At about the 15 minute mark, bring the puffs out of the oven and brush again with olive oil and sprinkle with more italian seasoning and parmesan cheese if necessary. (The second brushing will help to keep the pizza puffs moistened in the hot oven.)

*When I made these, I didn't watch when I was sealing up the pizza puffs and had a lot of the cheese melt out. In the future I may try and bake them sealed side up, just in case, or else just make sure the sides are sealed up really well.

Sweet Cheese Biscuits

There is a restaurant in various locations in Alabama that has the BEST cheese biscuits!! Its called Jim n' Nicks and they have perfected these delicious treats, and I have so longed to learn how to make them! There is something secret in them, and I have yet to figure it out! In the meantime, I made these biscuits, as created by Stephanie over at Plain Chicken.

I have to say, while they don't taste exactly like J&N, but still, these biscuits are pretty tasty! The combo of cheese and sugar may sound weird, but they are pretty delicious! And they are super moist, so they will make a great addition to any meal!


Sweet Cheese Biscuits

1 1/2 c. Bisquick
3/4 c. buttermilk
3 Tb. sugar
1/4 tsp vanilla
1 c. shredded cheddar cheese

Preheat to 350 degrees.

Combine all ingredients. Spoon batter into muffin cups. For easier removal, spray muffin cups with cooking spray. For mini muffins, bake about 15-20 minutes. For larger sized muffins bake about 20-25 minutes. Cooking times will vary with how full muffin cups are, and due to high heat, check muffins periodically to ensure they don't burn.

*As you can see from the pictures, the batter provided me with 12 mini muffins and 3 larger ones.
* Don't mind the squished in tops of the larger muffins...I was in too big of a hurry to go find a toothpick so I crammed a fork down in the middle of them and crushed the tops. Whoops :)

Saturday, September 10, 2011

Poppy Seed Party Sammies

I LOVE these little sammies! They are so good. I had them the first time during a holiday dinner at BC's parent's house. They have a family tradition of making tons of finger foods the night before Christmas, and this was one dish. So, when I was planning what to bring to my parents house to watch Alabama destroy Penn State, I took that recipe and the recipe from Macaroni and Cheesecake to create my own.

(I know this picture doesn't look appetizing. Try this, I promise you will love it!!)

1 package of Original King's Hawaiian Rolls
1 package of swiss cheese slices (I think there were 8 pieces in my package)
1 package of honey ham
1 stick of salted butter
1 1/2 Tb. poppy seeds
1 1/2 Tb. yellow mustard
1 tsp. worchestershire sauce
1/4 tsp onion powder

Take the rolls out of the packaging and slice all the way through so you have a connected half of tops and a connected half of bottoms. Set the bottoms into a baking dish. I used a 9"x9". Melt the butter in the microwave and mix in the poppy seeds, mustard, worchestershire, and onion powder. Spread some of this mixture onto the bottoms of rolls, just enough to cover. Place the cheese slices on top of the butter spread and then place the ham on top of the cheese. Top the ham with the tops of the rolls. Pour the remaining butter mixture over the tops of the rolls and brush all over to even out.

Top with tin foil and bake at 350 degrees for about 15 minutes, or until cheese is melted.

*You can use a variety of different types of rolls if you can't find the King's rolls. For example: the Colonial bread company makes a pan of rolls that are smaller and come in their own tin tray for easy baking. You can use all the same measurements for this recipe, even if you use other types of rolls.

Buttermilk Biscuits

I'm SO excited to share this recipe with you all! I made these this morning, and they were absolutely AMAZING!

I've always wanted to make really delicious biscuits. I've never really known the tricks, and I've always been jealous of women who could bake really well. For some reason, I felt like if I could master biscuits, I would be finally be a "true" Southern woman. After lots of questions and yucky trials and a very serious pow-wow with Mrs. Sue, an amazing cook and one of the local judges' judicial assistant, I've discovered this recipe:


Buttermilk Biscuits
recipe from the White Lily package and my brain
2 cups All-Purpose Flour (I used White Lily, a flour available in most Southern stores)
1Tb. baking powder
1 tsp salt
1 stick butter (salted) (VERY cold)
3/4-ish cup buttermilk (use enough until the dough is just barely wet enough)

Cut butter into small pats and lay out on a cookie sheet lined in wax paper. Stick in the freezer for at least 10 minutes. Prepare cast iron skillet with a tiny amount of bacon grease, if available. Easiest thing: fry one piece of bacon, wipe out the pan, and you're good to go!

Combine all the dry ingredients together and then cut in the butter. Cut in until the butter is about pea sized, relatively well mixed in. Add buttermilk. Add slowly until you have just enough where the dough separates from the sides of the bowl. Stir until just combined and roll it out onto a well-floured surface.

Before kneading, cover with some flour. Knead a couple of times and flatten out to about 1" thickness. (Honestly, the thicker the better, because they rise so beautifully!) Using a biscuit cutter, or just a glass cup, cut out biscuits. Press straight down, don't twist the cup/cutter.

Place biscuits in a cast-iron skillet and be sure biscuits are touching.

This recipe doesn't make a ton of dough. Especially if you end up using a large biscuit cutter. See the butter?

This is how thick I usually keep my dough. It rises the best if you can keep little chunks of butter in it! Please ignore the very messy kitchen area.

The finished product!

Bake at 500 degrees for about 8-10 minutes. At about the 6 minute mark, take the skillet out of the oven and brush the biscuits with melted salted butter. You pretty much have to brush the tops with butter. This is an integral part of the baking process. And be liberal with it, brush on the sides of the biscuits if they are showing.

There are some really important notes that go along with this I need to share:
*White Lily flour is important. Apparently its made with a certain kind of wheat that makes it have a lower protein count than most generic flours. It makes the biscuits lighter and fluffier. Even if you don't have that kind, try to get one that is made with a soft winter wheat.
*Make sure the butter is salted and SUPER cold.
*Cooking the biscuits in the cast iron skillet is the best part! Use one for best results, and try to put some sort of grease on the bottom. You don't want a lot in the pan. If you do fry up something in the pan, be sure to let the grease cool, pur it all out, scrape the pan, and use a paper towel to soak up the rest. All you are looking for is a faint sheen on the bottom!
*You can use whatever size biscuit cutter you want. I've made big "cat-head" biscuits (as my North Carolinian husband called them) and small ones. However you adjust the size, just be sure to watch them carefully while in the oven and keep the dough THICK, regardless of the size of cutter you use.

Go give this recipe a try, they taste amazing!

Update: this was my very first submission to Tasty Kitchen! Go check it out!