Wednesday, August 15, 2012

Sweet Blueberry Biscuits

UPDATE: Welcome Pinterest people! this recipe has gotten my lil blog so much traffic and I'm so happy you are here! If you have any questions, feel free to comment and I'll do my best to get back to you! Thanks!

I cannot say enough about these biscuits. The first time I made them was a huge experiment, but they turned out so good and got rave reviews!!!

Sweet Blueberry Biscuits

Biscuits:
adjusted from the Buttermilk Biscuits post
2 cups All-Purpose Flour (I used White Lily, a flour available in most Southern stores)
1 Tb. baking powder
1 1/2 tsp salt
3 Tb. sugar
1 stick unsalted butter (VERY cold)
3/4-ish cup buttermilk (use enough until the dough is just barely wet enough)
1 c. frozen blueberries (we used fresh blueberries that had been frozen overnight)
1/2 stick melted salted butter

Sauce:
1 c. powdered sugar
3 Tb. milk (or more if not thin enough)
1/2 tsp. vanilla

Cut butter into small pats and lay out on a cookie sheet lined in wax paper. Stick in the freezer for at least 10 minutes. Prepare cast iron skillet with a tiny amount of bacon grease, if available. Easiest thing: fry one piece of bacon, wipe out the pan, and you're good to go!

Preheat oven to 500 degrees.

Stir the sauce ingredients together (powdered sugar, milk, vanilla), and make sure the powdered sugar is completely dissolved.

Combine all the dry ingredients (flour, baking powder, salt, sugar) together and then cut in the cold unsalted butter. Cut in until the butter is about pea sized, relatively well mixed in. Add buttermilk. Add slowly until you have just enough where the dough separates from the sides of the bowl. Stir until just combined and roll it out onto a well-floured surface.

Before kneading, prepare a large area for kneading. (I use a large cutting board for easy clean-up!) Sprinkle the area with some flour. Put the dough on the floured area and sprinkle some flour over the dough. Press the dough out (no need to roll with a pin) and flatten to about 1/2″ thickness. Put blueberries over dough. Knead a couple of times and flatten back out to about 1″ thickness. (Honestly, the thicker the better, because they rise so beautifully!) The berries will likely start to bleed onto the dough and you’ll start to see flecks of blue as the berries defrost.

Place biscuits in a cast-iron skillet and be sure biscuits are touching.

Bake at 500 degrees for about 10-12 minutes. Somewhere around 6 to 8 minutes, take the skillet out of the oven and brush the biscuits with melted salted butter. This is an integral part of the baking process. And be liberal with it, brush on the sides of the biscuits if they are showing. When you begin to see the tops lightly brown (and the blueberries burst), take them out. The temperature in the middle of the biscuits will remain very hot once out of the oven and will continue the cooking process.

NOTE: Some people have mentioned that they have to leave their biscuits in for longer than 10 or 12 minutes. I have never had to leave mine in for longer, but if you fear yours aren't getting done and want to leave them in for longer, be sure to watch them like a hawk! I promise, they will go from done to burnt in just a few seconds!

When you take the biscuits out of the oven, let the pan cool for about 10 minutes. Pour the sauce over the biscuits after 10 minutes. Use as much or little of the sauce as desired.

Serve immediately!

Spinach & Sausage Quiche

I through this one together with whatever I had in the fridge--that always makes the best kind of quiche!

Spinach and Sausage Quiche
1 frozen pie crust
1 c. chopped, cooked spinach (if previously frozen, be sure to drain completely)
1/2 c. crumbled turkey sausage
3/4 c. shredded cheddar cheese
3 oz. softened cream cheese
4 eggs
1/8 c. chopped onion
salt and pepper

Preheat oven to 350 degrees.

Poke holes in crust with a fork and pre-bake crust for 10 minutes.

Softened onions, either in a skillet or microwave.

In a bowl, mix eggs, crumbled sausage, cheddar cheese, cream cheese, and softened onion. Mix until completely combined. Add salt and pepper.

Pour mix into pie crust and bake for 30 minutes. At the 30 minute mark, take the quiche out of the oven and with a fork, stir the egg mixture. This will help ensure a more even cooking process.

Put the quiche back into the oven for another 10 minutes, or until completely cooked through. The amount of time needed to finish will vary.

Summer Vegetable Alfredo Pasta

This recipe came together on a whim, based on stuff I had in the fridge that needed to be used! It ended up being super tasty, and I think you'll like it too!
Summer Vegetable Alfredo Pasta
1 box multi-colored rotini pasta
3 medium yellow squash
3 medium zucchini
2 Tb. canola oil
1 turkey sausage kielbasa
1 c. Alfredo sauce (I used Ragu's Light Parmesan Alfredo)

Cook pasta according to directions.

Chop yellow squash and zucchini. Saute in canola oil until soft.

Chop kielbasa into small slices. In a separate pan, saute kielbasa until browned. Add pasta and kielbasa in with vegetables. Add the Alfredo sauce and stir all together. Heat through and serve warm.

Italian Sausage Pasta Sauce

This is my favorite pasta sauce! Its really easy to make and now that I've discovered this gem, I simply cannot accept jarred pasta sauces anymore!
Italian Sausage Pasta Sauce
adapted from Italian Food Forever
1 lb. ground mild Italian sausage
1/2 c. chopped onion
2 tsp. minced garlic
2 Tb. olive oil
1 28 oz. can crushed tomatoes
3 Tb. dried basil (start off with 2 Tb. and add more to taste)
2 tsp. dried oregano (start off with 1 tsp. and add more to taste)
1 tsp. red pepper flakes
cooked pasta (your choice)

Saute the chopped onion and minced garlic in the olive oil until onions are translucent. Add Italian sausage, cook until just done. Drain any grease and add back into saute pan. Add in crushed tomatoes, basil, oregano, and red pepper flakes. Bring to a simmer and cook for 10-15 minutes on a low heat. **Adjust seasonings to taste**

Pour over pasta, and enjoy!


Tuesday, July 31, 2012

Peach Crisps for Two!

I came across this recipe, after looking for something dessert-y to do with some peaches I got from a local fruit&veggie stand. I only had two, so I couldn't pull off a whole cobbler, and since it's just me and my husband, we definitely didn't need a whole cobbler anyway! Once I found this recipe, I couldn't wait. And it was really good!!


Peach Crisps for Two!
slightly adapted from Joy the Baker

1 peach
1/4 c. flour
1/4 c. brown sugar
2 Tb. chilled butter
3 Tb. old-fashioned oats
1/4 tsp. cinnamon
1/8 tsp. ground ginger

Preheat oven (or toaster oven) to 350 degrees.

Cut peach in half, scoop out pit. Scoop out spaces a little more to make room for the oat mixture. Score the peach flesh with a knife. Mix all dry ingredients in a bowl. Using a fork, mix in the butter with the oat mixture until you get tiny bits of butter mixed through. Pile in the oat mixture into the center space and on top of the rest of the peach half. (You can either use the whole amount of oat mixture and spread it all around, or save half for a future peach. It makes a lot!)

Bake for about 20 minutes. Enjoy!


Saturday, May 19, 2012

Oatmeal Raisin Cookies

For most of my life, I basically hated oatmeal raisin cookies. I thought the raisins totally ruined the delicious oatmeal cookies. Recently I had a hankering for oatmeal raisin cookies, and came across this recipe. With a little tweaking, I think this one is definitely a keeper!


Oatmeal Raisin Cookies
as adapted from Mary Ellen at Whisk Together

1 c. all-purpose flour
1/2 tsp. baking powder
1/2 tsp. baking soda
1/2 tsp. salt
1/2 c. butter
1/2 c. brown sugar
1/4 c. granulated sugar
1 tsp. vanilla extract
1 egg
1 1/2 c. oatmeal*
3/4 c. raisins**

Preheat oven to 350 degrees. In a bowl, combine the flour, powders, and salt. Set aside.

Cream together the butter and sugars. Add in the vanilla and egg and mix on high until light and fluffy. Add the dry mixture into butter mixture about 1/2 c. at a time until completely mixed in. Stir in oatmeal and raisins.
Drop dough onto parchment lined cookie sheets. Bake for about 11-13 minutes.

*You can use either quick cooking or old fashioned oats. I've used both and the cookies turned out fine each time.
**I used three little boxes of raisins. This isn't exactly an exact science. You can leave the raisins out, exchange them for something else (cran-raisins, chocolate chips, etc), or add more/less!

Monday, May 7, 2012

Honey Coconut Rice Pudding

Recently, I've been trying out new recipes. Combine that with the need to make a light dessert, and I settled on this recipe for rice pudding! I have never had rice pudding before, and the ingredients in this one sounded so delicious, I just had to try it. End result? DELICIOUS!


Honey Coconut Rice Pudding
recipe courtesy of, and slightly adapted from, Fujimama

1 3/4 c. light coconut milk
1 1/2 c. 2% milk
1/2 c. Japanese rice (also called Sushi rice--NOT Jasmine rice!)
2 Tb. sugar
1 1/2 tsp. vanilla extract
3 Tb. honey

Mix together coconut milk, 2% milk, rice, sugar, and vanilla extract in a medium saucepan and set over medium-high heat. Stir continuously so the rice doesn't stick to the pan. When mixture comes to a boil, reduce heat and simmer. Keep stirring!

Remove saucepan from heat and add honey. Let pudding stand for about 5 minutes before splitting up into 4 separate bowls. Add more honey, if desired.

Wednesday, April 25, 2012

Reese's Cup Birthday Cake

In addition to the yummy meatloaf and baked beans served at this year's birthday dinner for my husband, I also made him a birthday cake. He loves Reese's Cups and frankly I couldn't think of a better flavor combination for a cake! I did some research on Pinterest, and came away with three different recipes to combine into one: chocolate cake, peanut butter buttercream icing, and decoration. I have to say, the combination of the three was a total hit!!


Reese's Cup Cake
adjusted slightly from Picky Palate

1 box Devil's Food Cake Mix
4 large eggs
1/2 c. vegetable oil
1/2 c. water
8 oz. sour cream
1 small box instant chocolate pudding mix
Bag of Mini Reese's Cups

Preheat oven to 350 degrees.

In a stand mixer, combine cake mix, eggs, oil, water, sour cream, and pudding mix. Mix until combined through. Pour batter into buttered and floured pans. Cook according to size of pans (i.e. 30-35 minutes for 8-in. round pans, 20-25 minutes for 6-in. pans, etc.). Be sure to check on cake several times while in oven to insure proper baking time. Do not overbake!


Peanut Butter Buttercream
adjusted slightly from Bird On A Cake

1 c. salted butter, softened
2 c. peanut butter
4 c. powdered sugar

Beat the softened butter and peanut butter together until smooth. Slowly add in powdered sugar while continuing to mix. Add small amounts of milk if frosting is too thick/unspreadable.


After taking the cakes out of the oven, remove them to wire racks to cool. When pans are cool, remove cakes. Using a long knife, remove rounded tops of cakes, if they rose too much in the middle during baking. You want flat surfaces to work with. When you are ready to frost the cakes, place a small amount of frosting on the cake plate to hold the bottom layer in place. Frost between each layer and use the remaining to cover the cake. (You should have at least 1/4-1/2 of the original amount of frosting to use for the tops and edges of the cake.) Chop up mini Reese's Cups for decoration. I got my inspiration from here.


This cake truly is delicious! Try it out!

Monday, April 23, 2012

Mom's Baked Beans

This is the title of the recipe email I received back in 2009. In 2009, I spent Christmas with my husband (then boyfriend) and his family for the first time. His mom made these beans and ohhhh dear, are they ever delicious!! My MIL thinks its hilarious because she took a basic recipe and just tweaked it a bunch, so it's not really that involved or difficult, yet everyone goes bananas for them!!

This is also a regular part of the birthday menu rotation. You can find the main attraction, the meatloaf recipe, here.


Mom's Baked Beans
as copied from EGC, my mother-in-law

2 16 oz. cans Van Camp's Pork and Beans
1 chopped medium onion
4 tsp. vinegar
1 tsp. dry mustard
1/4 c. packed light brown sugar
1/2 c. molasses
1/2 c. ketchup
Garlic salt (to taste--start w/half a teaspoon)
Black pepper (to taste)
4-6 slices of uncooked bacon

Preheat to 350 degrees.

Stir together all ingredients, except bacon. Taste and determine if more garlic salt or pepper is needed. Pour ingredient into a greased 2 quart casserole dish and top with bacon.

Bake for 2 hours.

Best Ever Meatloaf

So begins the litany of birthday recipes. This particular recipe is long overdue. Every year, my husband requests a particular dinner for his birthday: meatloaf, baked beans, and Mac and cheese. It makes birthdays very easy, because I can prepare in advance. You can find the recipe for the baked beans here.

This recipe has two parts, the meatloaf and the sauce topping. The meatloaf recipe was from my husband's sister and the sauce recipe was from his mom. Together they make a fabulous combo!!!


Best Ever Meatloaf
as created by AT, my sister-in-law

2 eggs
2/3 c. milk
4 slices of bread, torn into bits
1/2 c. chopped onion
1 c. shredded cheddar cheese (do not use pre-shredded!!)
1 tsp. dried parsley
1 tsp. dried thyme
1 tsp. salt
1/4 tsp. pepper
1 1/2 - 2 lbs. lean ground beef

Preheat oven to 350 degrees.

In a large bowl, beat eggs. Add milk and eggs, let stand until liquid is absorbed. Stir in the onion, cheese, and seasonings. Crumble beef over mixture and mix well.

In an 8" x 8" greased baking dish, spread meat mixture out across dish. Bake uncovered for 45 minutes.

Meatloaf Topping
as created by EGC, my mother-in-law

3/4 c. ketchup
1/4 c. packed brown sugar
3/4 tsp. dry mustard
1/4 tsp. allspice

Combine ingredients and spoon half of mixture over meatloaf. Bake 30 minutes longer, or until meat it no longer pink and thermometer reads 160 degrees. During cooking time, continue to brush sauce on meatloaf.

Let stand 10 minutes before serving.

Smeeps

Of course, thanks to Pinterest, I usually spend at least an hour a week drooling over junk food photos on Pinterest.

This s'more recipe was one of the photos I found! And thanks to the endless amounts of Peeps we had at our house during Easter, it was an easy thing to throw together!

(please ignore our fine china!!)

Smeeps
as seen everywhere on Pinterest

Peeps (preferably the bunnies)
Graham crackers
Chocolate bar (we used dark chocolate!)

If you can't build up a fire, a microwave will work just fine!! Layer the graham cracker, chocolate piece, and Peep. Stick it in the microwave for about 10 seconds, but watch very closely! Marshmallows tend to explode in the microwave! If 10 seconds is not enough, only heat with another 10 seconds. When marshmallow is heated, top with another graham cracker piece.

Enjoy your Smeeps!

Sunday, April 22, 2012

Roasted Veggie Lasagna

I found this recipe on the Panera website, actually, and was so excited to try it! I've always made just a traditional meat and cheese lasagna, and never tried roasted veggies before. This recipe is easily customizable, and you can add or subtract to suit your needs!


Roasted Vegetable Lasagna
as adapted from My Panera 
12 lasagna sheets
2 red peppers, core removed and cut into slices
2 eggplant, peeled and cut length-wise into 1/4 inch slabs
3 medium zucchini, cut length-wise into 1/4 inch slabs
3 medium yellow squash, cut length-wise into 1/4 inch slabs
24 oz. ricotta/cottage cheese
1 1/2 c. shredded mozzarella cheese
1/2 c. grated Parmesan cheese
1 28 oz. can of tomato sauce
1 tsp. minced garlic
1/2 c. chopped onion
1 Tb. olive oil
1/2 tsp. dried oregano
3 tsp. dried basil (more to taste)

Preheat oven to 450 degrees.

Take the chopped onion and tsp. of minced garlic and saute in the Tb. of olive oil over medium heat until the onions become translucent. Add the can of tomato sauce and dried oregano and basil and reduce the heat. Simmer while cooking vegetables.

Take two cookie sheets and lay out all slices of vegetables. Brush each side or each slice with olive oil (or spray each side with a Misto...seriously I need royalties, I talk about those products so much!!) Sprinkle with salt and black pepper. Roast for about 20 minutes on one side, flip and roast for another 15-20. This is will change based on how thick you cut the vegetables. So watch closely if the slices are thinner!

In the meantime, cook the lasagna noodles until slightly underdone. Once they are done cooking, set them aside to cool.

In another bowl, combine the ricotta/cottage cheese, 1/4 c. of Parmesan, 1 1/2 c. mozzerella, egg, and salt and pepper. Stir to combine. Taste to determine if more salt or pepper is needed!

Reduce oven temperature to 350 degrees.

In a 9"x13" pan, spoon a bit of tomato sauce in the bottom. Layer noodles, cheese mixture, sauce, and vegetables. Repeat the process until all vegetables are used up. (I got three layers). Top final noodle layer with remaining sauce and sprinkle with the other 1/4 c. of Parmesan.

Bake until cooked through and browned on top, about 30-35 minutes.


Tuesday, April 3, 2012

3 Envelope Pot Roast

This is so easy!! And so delicious!! I'm all about a crock-pot meal, and this one does not disappoint :)


Three Envelope Pot Roast
original recipe by Plain Chicken

1 3-lb. beef or pork roast
2 c. water
1 envelope onion soup/dip mix
1 envelope au jus mix
1 envelope zesty Italian dressing mix

Place roast in slow cooker. Pour water over roast. Sprinkle all three envelopes on top of roast. Turn slow cooker on low for 6-8 hours.

Sauteed Lemon Chicken

This was another Pinterest recipe I discovered and couldn't wait to try! The original recipe called for Meyer Lemons to be used but, unfortunately in our town, there aren't any Meyer lemons to be found. At least not at our Publix. So I had to go with regular old lemons. Honestly, it still tasted great, and wouldn't have thought otherwise!
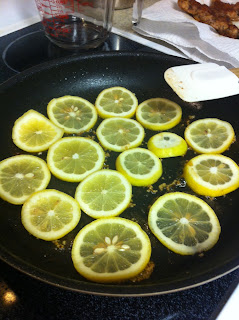
 (My lemons got a little burnt, hence the black-ish color. Don't be like me--keep an eye on the food you're cooking!)

Sauteed Lemon Chicken
adapted slightly from Shrinking Kitchen

3-4 boneless, skinless chicken breasts
2 tsp. dried oregano
1/2 c. flour
1 Tb. butter
1 Tb. vegetable oil
2 lemons
2 tsp. minced garlic
salt
pepper

Place each piece of chicken, individually, between two pieces of plastic wrap and pound out until thin. Sprinkle each side with salt, pepper, oregano, and flour. Shake off excess flour from each piece.
Heat a large skillet over medium high heat, melting the butter and oil together. Add chicken and cook until browned on each side. Remove chicken from skillet.
Slice lemons. Put garlic into skillet to heat up. Place lemon slices over the garlic.
Place chicken pieces over lemons. Reduce the heat to medium low for a few minutes until lemons soften and chicken is reheated through.

Monday, March 5, 2012

Fruit Pizza

The final dish I made to round out our ACC championship shin-dig was this fruit pizza. I got the idea from the Pioneer Woman, but I've had tons of different kinds of fruit pizzas in my life. I'll reference her in this recipe because, technically, I got the idea that day from her :) These types of recipes are AWESOME because you can totally adjust to what is in season. And, I mean, who doesn't like eating sugar cookies and fruit?? Come on!


Fruit Pizza
as adapted from Pioneer Woman's Deep Dish Fruit Pizza

1 roll of sugar cookie dough
1 14 oz jar of marshmallow fluff
1 8 oz fat free cream cheese
whatever fruit you like! (I used strawberries, bananas, and peaches)
lemon juice (if needed)
brown sugar

Cover a cookie sheet with parchment paper for easy cookie removal. Roll out cookie dough until it becomes a thin rectangle (or as close as you can get it, mine was a very lumpy rectangle!)

Bake cookie according to directions on package. (I baked mine according to the package, temperature and all, but watched it closely to ensure it didn't burn.)

While the cookie is baking, whip together marshmallow fluff and cream cheese until creamy and mixed through. Chop up fruit into pieces, if needed.

**Important, if you use fruit for your pizza that could possibly brown after being cut up, be sure to sprinkle with some lemon juice. I didn't have any, and thus didn't do that. Result: browned fruit :(

When the cookie is done baking, remove from oven and let cool completely. Spread cream cheese mixture on as thick as desired. Refrigerate until completely cooled. Add fruit and refrigerate again until ready to eat. Sprinkle on a bit of brown sugar before serving.

Delish Spicy Queso!

This is another recipe from our ACC championship day, which included our version of PW's Spicy BBQ sliders and fruit pizza. We LOVED this dip! It was so easy to put together and tastes way better than Velveeta and Rotel by themselves! I say, pick up the couple of extra ingredients, it will be worth it! But this isn't for the faint of heart, it is pretty spicy!

Spicy Queso Dip
as adapted from the Pioneer Woman's Chile Con Queso, Revved Up

1 16 oz. block of 2% milk Velveeta
1 can of Rotel, original
1 4 oz. can of chopped green chilies
1 Tb. diced jalapenos (more or less to taste)
1 lb. spicy sausage
3/4 c. chopped onion

Brown sausage and onion together in a cast iron skillet. Drain and set aside.

Chop up Velveeta into small squares, toss into a slow cooker. Add in Rotel, with juice, green chilies, with juice, jalapenos, and sausage mixture. Stir all together. Let the mixture cook together on low for an hour before eating for best flavor!

Enjoy!


Whiskey BBQ Sliders

A lot of people completely sink once football season is over. However, my husband is a huge UNC basketball fan, so once basketball season comes around, we just keep on tailgatin'. We usually move the party inside and make lots of little goodies. I love this, because it lets me try out fun recipes I find online. For the latest ACC championship, I made PW's Spicy Whiskey BBQ Sliders, Chile Con Queso, and Deep Dish Fruit Pizza. (Our version of the queso and fruit pizza are here and here.)


Whiskey BBQ Sliders
as adapted from the Pioneer Woman

1 lb. ground beef
2 Tb. butter
1/2 c. chopped onion
1/2 c. BBQ sauce
1/4 c. whiskey (1 mini bottle is the exact amount you need!)
several jalapeno slices (to taste)
1/2 cup shredded cheddar cheese
12 Hawaiian rolls

Preheat oven to 350 degrees.

Form beef into 12 little patties. Place into a cast iron skillet with 2 Tb. of butter. Cook until almost done. Remove from the pan, scrape out any grease.
Put about 2 Tb. of grease back into the pan with the onions, cook until soft.

While the onions are cooking, split the slider rolls and put them into a 9x13 baking dish and into the oven to toast for a few minutes. Watch carefully so they do not burn. Times can vary, depending on whether you simply want them warm or actually toasted.

Once the onions are softened and cooked down, add in whiskey and jalapenos and cook for 2-3 minutes until thickened. Add in BBQ sauce and cook for another 2-3 minutes. 

Once the sauce is thickened, add burgers back in to cook for another few minutes.
When ready to assemble, place one slider burger on bottom half of each roll, top with sauce and a little bit of cheese, and other roll half.
Enjoy!

Friday, January 27, 2012

Soft Spicy Ginger Cookies

My husband loves ginger. The more ginger-y tasting, the better. Form time to time we scour the local World Market, finding all kinds of ginger candies from other countries. Did you know they carry bags of ginger gummy bears from Australia? 'Cause they do!

Then we found a Whole Foods in South Florida that had a huge canister of crystallized ginger, one that allowed you to fill your own bag with whatever amount. BC was ecstatic. We bought a big batch....and then realized that you can only eat so much ginger before the little squishy ginger pieces get tough. Enter this recipe. Now, I don't really like Ina Garten, what with her hoity-toity-too-good-to-help-out-people-with-cancer-trying-to-make-their-last-wishes-come-true thing. However, I can't deny its a good recipe.

So, if you like spicy cookies, and looooove ginger, this one is for you!!

I forgot to take a picture until the next day....and there was only one cookie left! 

Soft Spicy Ginger Cookies
as slightly adapted from Ina Garten

2 1/4 c. all-purpose flour
1 tp. baking soda
2 tsp. ground cinnamon
1 1/2 tsp. ground cloves
1/2 tsp. ground ground nutmeg
1/2 tsp. ground ginger
1/4 tsp. salt
1 c. brown sugar
1/4 c. oil
1/3 c. molasses
1 egg
1 1/4 c. chopped crystallized ginger (6 oz.)
granulated sugar, for rolling cookies

Preheat oven to 350 degrees.

In one bowl, sift together the flour, baking soda, cinnamon, cloves, nutmeg, ginger, and salt. With a mixer, beat the brown sugar, oil, and molasses on medium speed for 5 minutes. Turn mixer to low, add the egg, and beat for 1 minute. Continue to scrape the bowl down while mixing to ensure ingrediatns are being combined. While mixer is on low, slowly add the dry ingrediants to the bowl and mix on medium speed for 2 minutes. Add the crystallized ginger and mix until combined. Dough may be very thick, and you may have to combine the crystallized ginger with your hands!

Take tablespoon sized pieces of dough and roll them into balls. Roll each cookie in sugar and place onto parchment paper lined cookie sheets. Flatten each cookie ball. Bake for at least 12 minutes. Adjust cooking time for size of cookie. Let cookie cool on wire racks.

Try not to eat too many immediately...they taste even better then next day!

Italian Balsamic Chicken

I don't really know how to describe this marinade, except it is so full of flavor and delicious for grilled chicken! Try it soon!

Italian Balsamic Chicken
as adapted from Plain Chicken

1 lb boneless skinless chicken breasts
1/2 c. EVOO
4 Tb. balsamic vinegar
1/2 tsp. salt
1/2 tsp. fresh ground black pepper
1 pkg. zesty italian seasoning/dressing mix
2 tsp. onion powder

Combine all ingredients in a gallon bag, except for chicken. Make sure all ingredients are well combined and then place thawed chicken into bag. Let soak for several hours, even overnight, and mix chicken around in the bag often. For best results, grill it up!

Saturday, January 21, 2012

Chili Dogs

My husband almost cried. Literally, came over and gave me a huge hug, told me how amazing dinner was, and started pacing. He then told me (1) he made a good wife choice and (2) I was a cooking master today. (Full disclosure: I made some of these for brunch.)

I ran across this chili dog recipe on In the Wabe, after some late night pinning on Pinterest. (Just as an FYI, weird stuff gets pinned late at night on Pinterest.) Anyway, there's a semi-secret ingredient hidden inside these things: mayo. You have to put some on the inside of the bun and something delicious happens while these things bake. Also, the oven makes the cheese all melty and the buns super crispy. Its an awesome combo.

Since they are chili dogs made by you, they are easy to make relatively healthy. You can use the whole wheat buns, turkey dogs, healthy chili, small amounts of cheese, and low fat mayo. I didn't do really any of those things (except the chili, and reduced fat Hebrew Nationals), but you can :)

Last thing...I used some left-over chili I made a few nights ago, which you can find here. I'm tellin' you----use the homemade stuff. It makes these things so much better.


Amazing Chili Dogs
as adapted from "Oven Hot Dogs" from In the Wabe

8 hotdogs
8 hot dog buns
chili (made my own, recipe here)
shredded cheese (I had less than 1/8 c. available in the fridge. Use as much or little as you like!)
chopped onion
mayonnaise
yellow mustard

Break out a 9x13 pan. Line with aluminum foil. You either need to spray some non-stick spray on the foil, or do what I do. Use this. It is seriously the most amazing thing ever.

Preheat oven to 350.

While oven is preheating, take each hotdog bun, open it up, and add mayo to each side of the insides of the buns. (Does that makes sense? That sounds confusing. But I know you understand.) Place a hotdog in each bun, lining the 9x13. You can usually get 6 along the botton and two across the top. We used reduced fat Hebrew National hotdogs, which are amazing, btw, but they come in packs of 7. Weird.

Once all the hotdogs are lined up, add a line of mustard to the top of each hotdog. Then top each with a generous amount of chili! Add some cheese to each, and sprinkle the tops with chopped onion.

Here is our odd 7 hotdogs. See the space for the eighth? Weird. But notice how packed in the 6 along the bottom are. Be sure to do this, it keeps the shape of the buns.

Cover with aluminum foil and bake for 45 minutes.

*Recipe linked up at The Sweet Detail

Tuesday, January 17, 2012

Coffee Cake in a Mug

My husband and I have been trying to eat healthy lately, so of course that means smaller portions for dinner. Since we're starving we usually eat early. Of course this means that around 7-ish, we want something else to eat. I decided to drive us to Dairy Queen because I know their hot fudge sundae is under 200 calories whip something up in the kitchen. So, I turned to Pinterest. I have several pins on Pinterest consisting of desserts in mugs.

Some are good.

Some are bad.

Some are disgusting.

This one, however, is pretty dang good.

My husband even approved, saying, "This one was actually good. Most of these kinds of recipes really suck." Good enough for me!

I made a few adjustments from the original recipe, courtesy of the ladies over at Prudent Baby.

My picture is not nearly as pretty and ethereal as theirs, but you get the idea. Plus, I mean, its cake in a mug. You don't have time to make that look pretty, when ya just tryin' to eat.

Coffee Cake in a Mug
adjusted slightly from Prudent Baby


Cake:
1 Tb. salted butter
2 Tb. sugar
1/2 egg (I made two cakes and split the egg between them)
2 Tb. buttermilk
1/8 tsp. vanilla
1/4 c. all-purpose flour
1/8 tsp. baking powder

Crumble:
1 Tb. salted butter, softened
2 Tb. all-purpose flour
1 Tb. brown sugar
1 tsp. cinnamon

Put butter into microwavable mug and microwave on high for approx. 10-15 seconds until softened. Mix in sugar until light and fluffy. Add in buttermilk and vanilla and stir until combined. Add in flour and baking powder and stir until combined.

In a separate ramekin, mix 1Tb. softened butter, flour, brown sugar, and cinnamon. Take a fork and combine until you get a crumbled combination. Pour crumble on top of batter.

Place mug in microwave for 1 minute. You may need to add more time, but increase by 10 seconds at a time. I think I ended up cooking mine for 1 minute 30 seconds, but all microwaves are different!

Mug will be very hot, so use with caution!! Enjoy :)

Tuesday, January 10, 2012

Amazing Steaks

I love a good steak. Growing up, my Dad always threw them on the grill. Sometimes they were awesome, sometimes they got a little dry, but I loved the way they got that crust on the outside. But grills can be super finicky and its so easy to over cook them. When I lived on my own, I almost never cooked steaks because I didn't want to bust out the grill for just one. When BC and I got married, I became more proficient with the grill, but still, a ton of work for two lil tiny steaks, and, again, so easy to over cook. We went the Georg Foreman route but, no offense George, dang those things things cook so fast, and sometimes they totally char up the outside before the middle is nowhere near being ready.

Enter the cast iron skillet.

Its so simple.

The cast iron skillet is the perfect way to cook food. It can literally go from biscuits in the morning, to grilled cheese sandwiches at lunch, to steaks at dinner!

Naturally, this takes some practice. You work with such high heat, that it requires total focus to make sure you don't (1) burn your steaks right up or (2) start a fire. (Perhaps that should have been #1?) I've used this method once or twice before, and I have to say, my most recent effort was the best yet.

Before I address the recipe, its important to discuss two things:
1. Type of Steak: This is very important. You want to make sure you have a fair amount of marbling, but not so much you get barely meat and not too little that there won't end up being any juice for it to sizzle in. My favorite cut is a chuck eye. Seriously people, it is a rare gem of deliciousness, and usually ends up being pretty cheap. Tonight I made two 4 oz chuck eyes I found on sale at Publix for a little over $4!! They were on sale (and generally go on sale quite a bit) so when I find them, I load up. I've also done this recipe with filet mignons before, which worked out nicely, but cooked a little longer because they tend to be thicker cuts than chuck eyes.

2. Thickness of Steak: This will cause you to adjust your cooking time quite a bit. You'll see here, for my 4 oz chuck eyes, it was 1 minute total in the pan, two minutes total in the oven. They were long and thin. I've done 4 oz. filets before that were small and thick and ended up going a total for 4 minutes in the oven. Its all about watching the steaks, making sure the coloring looks good, and testing the temperature to make sure you don't overcook them.

Amazing Steaks


2 steaks (I used chuck eye steaks here)
peanut or safflower oil
salt
pepper

Yep, just four ingredients :)

Preheat oven to 500 degrees.

Throw your cast iron skillet in the oven while the oven is preheating.

While you are waiting for the oven, grab the steaks, liberally salt each side, and grind some fresh black pepper on each side.


At this point you want to add a tiny bit of oil to each side. I put peanut or safflower oil on the ingredient list because they handle high heat the best. They have the highest smoking points. If you don't have this, its ok, but you might end up with lots of extra smoke. I ran out of peanut oil and used a canola blend tonight, which worked fine, just lots of smoke.

I sprayed it on with my handy Misto sprayer. These things are amazing! I found one for cheap at TJ Maxx a while back, but got two really nice ones from the ILs for Christmas!! I LOVE these things because you can use regular oil in them and not have to buy Pam or whatever with all its weird sketchy additives.


Once the oven is done preheating, take our pan out and put it on a burner on high heat for a few minutes. Ideally you want it on there for like 5 minutes. However, my pan had some residue on it and started smoking really bad and I got a lil paranoid I was going to burn down the house. So I didn't make it the full five.

Once you've let it really heat up, throw those steaks on there!!


They will be sizzly and smoky and a little scary at first. Just go with it. Now, this is IMPORTANT: leave them for 30 seconds. DON'T TOUCH FOR 30 SECONDS.

Then flip. 


DON'T TOUCH FOR 30 SECONDS. Seriously, leave them alone.

After 30 seconds are up, throw them in the 500 degree oven for 1 minute.

After 1 minute, take them out, flip, and throw back in for another minute.

After that minute, take them out, temp test them, and see where you are. For me, they were between medium and medium well, which is where I like it. Steak people think that is whack and you should eat them still mooing and super rare or something, but WHATEVER, my steak world.

When you get to the temp you want, make sure you let the steak rest for at least 5 minutes before you cut into it. I like to go ahead and put them on plates and cover with tin foil. That way the steak rests and stays warm.

Eat and be merry!

Tuesday, January 3, 2012

Peanut Butter Fudge

This is a recipe from a loooong time ago. I grew up with this one, my mom would make this fudge every year around the holidays. I became 100% addicted. She stopped making it over the years, which spurned me to go to my parents house and dig the recipe out of her stuffed recipe box. I think the first couple weeks I had it, BC and I made this fudge like 4 or 5 times.

The recipe originally came from my grandmother. It was printed sometime back in the 80s in a newspaper in South Florida. Despite being laminated, the newspaper is weathered and brown and old. I can never ever eat peanut butter fudge from a shop again...I'm a total snob for this recipe!

ALSO--This recipe contains NO butter! Yes, it is possible to make delicious pb fudge without a stick of butter!

(please, try to contain your excitement for the fancy paper towel in the picture. fine china here only, folks.)

Peanut Butter Fudge
recipe courtesy of my Mother and Nanny

1 c. sugar
1/4 tsp. salt
3/4 c. milk
2 tsp. vanilla
3/4 c. peanut butter

Butter a 8x8 baking dish. Set aside.

Combine sugar, salt, and milk in a saucepan. (Make sure you use a pretty big saucepan here...once the sugar starts getting all bubbly, its going to rise a LOT.) Heat the sugar mixture on high until you get to the soft ball stage--235 degrees. (Depending on how awesome your stove is, this could take you about 3 minutes, like at my MIL's house, or a good 10 minutes, like at mine. Boo.)

Once you reach this temperature, immediately remove from heat and stir in vanilla and peanut butter. Stir fast, until the mixture loses its sheen. (Be prepared to stir for several minutes.)

Pour mixture into prepared baking dish. Refrigerate.

Sunday, January 1, 2012

Banana Pudding

I first had this dish this past Christmas, when BC and I were at his parents house. His Mom had gotten this recipe from one of the lunchroom ladies at the school she taught at. I have to say, it is so freaking delicious. I mean, I'm not a huge banana pudding fan, and initially blew it off as just another bananas pudding. But friends...this is so much more.

*Update: I was asked to be a part of a dessert linky party with this recipe! My first one ever, pretty excited :) Check it out here.


Banana Pudding
recipe from my MIL and some unknown lunchroom lady

2 bags of Pepperidge Farm Chessman Cookies
2 small boxes of French Vanilla instant pudding mix
6 bananas
1 8-oz box of cream cheese, softened
1 12-oz. tub of Cool Whip
1 can of sweetened condensed milk
1 cup milk

Line a 9x13 pan with one bag of Chessman Cookies. (You may have to break up some of the cookies to fill in gaps.) Slice up all bananas and layer on top of cookies.

Mix together the pudding boxes and cup of milk in one bowl. Set aside.

Mix together the softened cream cheese and condensed milk in another bowl. Fold in Cool Whip. Add this mixture to the pudding mixture and stir to combine.

Pour pudding mixture over bananas. Layer second bag of cookies over pudding mixture. Refrigerate for several hours, overnight if possible!